


HAPPY HALLOWEEN!!! Today I have a little eye candy for you with the most adorable little cake topper.
Remember last week's post? I reviewed one of Craftsy's classes, Cake Toppers Techniques-Fondant Animals, so I decided to go ahead and practice what I learned from Craftsy making a cake topper.
Enter... Super Horse to the rescue!!


This tiny little horse turned out so cute , all dress up for Halloween and it was so easy to make.
Let me show you how...
Materials you will need:
-Black and brown edible writers ( you can use the brown to make some hair on the horse's head)
-Dark and light brown fondant
-Black fondant
-Small brush and water
-Modeling tool ( optional)
-Small pairing knife
-Shortening
-Small rolling pin and mat
-Wilton #12 round tip
-Small piece of paper towel or plastic wrap
-One piece of spaghetti pasta

Instructions:
-Start by knitting the fondant and making a log ( use shortening if the fondant starts to stick to your hands)
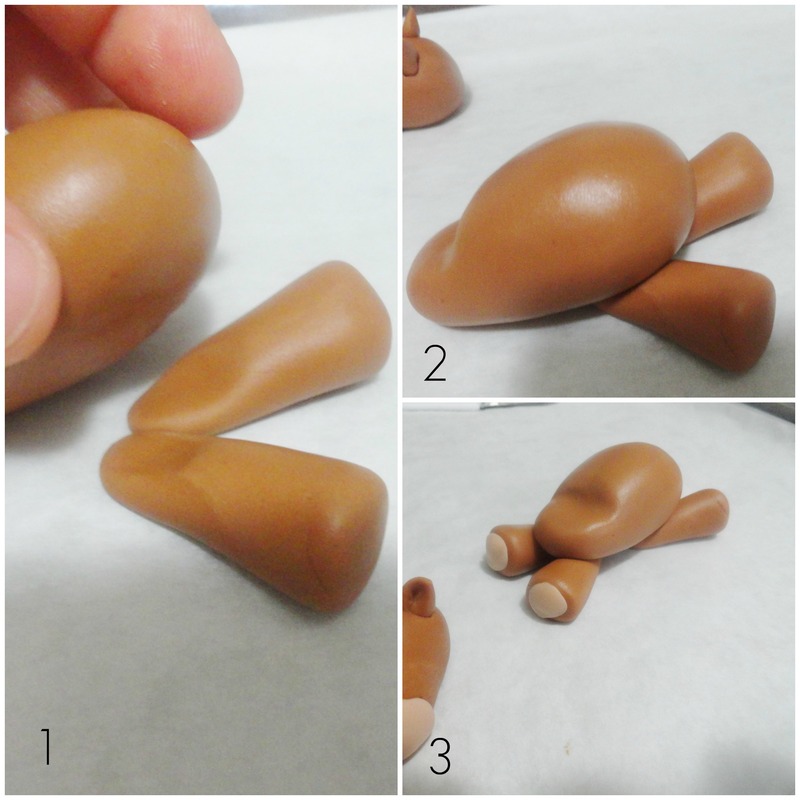
-Using the knife, mark and then cut the fondant in 4 pieces, 1 will be for the head and ears, 2 pieces will make the body and the last piece has to be cut in 4 little pieces to make the legs.
-Take the 2 pieces of fondant and knit them together, then, using the palm of your hands make an egg shape
-Mark the top of the egg shape using your fingers ( that's where the head will be) and set aside.

To make the head, knit and form the fondant into a ball, then into an egg shape.Use your fingers to go back and for to mark the nose area. Use your modeling tool or a tooth pick to mark an indentation for the ears.

To mark the nose, just make an egg shape using light brown fondant and flatten it out, use a dab of water and attach to the horse face.

The ears are just tiny little pieces of fondant rolled into a tear drop, mark the center of each ear using the back of the brush. Attach the ears to the head with a dab of water. Use your black edible marker to make the eyes and nostrils.

The legs are made rolling the fondant between the palms of your hands into a cone shape.

Now that you have all the body parts made, begin assembling the horse.
Position the back legs close together, rub a dab of water on them and place the body on top. Do the same for the front legs.Notice I did mark the legs with a piece of light brown fondant that I just roll into a ball and then flatten it out and attach it with a dab of water.
Set the body aside to dry a little
To make the cape, I just rolled a small amount of black fondant and hand cut the shape of the cape. I inserted the spaghetti pasta into the top part of the body ( this is going to hold and support the head) and attach the cape to the neck area with a dab of water.
I wanted some movement for the cape, so I placed a small piece of paper towel underneath and let it dry.

Make the mask using your fingers and a big round tip to remove the fondant from the eye area.

To complete the horse assembly,attach the mask to the head with a little water and then insert the head into the pasta stick.
Set the horse aside and let it dry.

I didn't add a tail to my horse, ups!!

Place your cake topper on a cake and you are done!
a fun and easy little horse cake topper that can be use on a Farm or Western theme cake.

Don't forget that Craftsy can turn your cake ideas in reality, right in your own home, learning at your own pace and schedule.From fondant to isomalt and modeling chocolate, Craftsy Cake Decorating courses are taught by the best instructors from around the world.
Click here to receive 25% off your first Cake Decorating course with Craftsy!
This is a sponsored conversation written by me on behalf of Craftsy. The opinions and text are all mine.


2 comments:
SUPER ADORABLE. You are so talented, I struggle with fondant/gumpaste modeling. You make it look easy.
OMG! I love Super Horse! He's such a little cutie-pie!
Post a Comment
Thank you for taking the time and leaving a comment.I really appreciate it.