Showing posts with label Dessert. Show all posts

Thursday, August 1, 2013

Sweet Cream Rice Pudding

So my husband is Mexican and I am from Costa Rica, "Arroz con Leche" AKA rice pudding is a dessert that has been in our lives forever. We eat it  hot or cold, I personally like mine warm, my husband likes his frizzing cold. I do not make it as often as I would like because is so good and rich that I end up eating the whole thing myself, then stretchy pants are a must the rest of the week.
Any way, we have been craving "Arroz con Leche", so I decided to made it adding Cold Stone Sweet Cream International Delight Creamer. Did you know that they also have 3 new ice cream creamer flavors in the market?  Churro Caramel, Hot for Cookies and Founder's Favorite, just imagine the taste of ice cream in your hot or ice coffee. I am sure it never tasted so good using these new creamers. I absolutely love Cold Stone Churro Caramel Creamer, the caramel addict in me wanted me to used this flavor for my rice pudding, unfortunately it was out at my local grocery store, so I went for the Cold Stone Sweet Cream!  Rich, creamy and smooth!


This rice pudding is delicious as it is,adding the Cold Store Sweet Cream make it so creamy, I also added raisins to bust the flavor, but this is something that you can totally skip.


The start of the party!


Sweet Cream Rice Pudding
Serves 8-10

Ingredients:

1 cup of long grain white rice
1/2 cup of water
1/3 cup of International Delight Cold Stone Sweet Cream Flavor Creamer
1 cup of condense milk
1 cup of evaporated milk
3 cups of milk
5 whole cloves
1/4 teaspoon of cinnamon powder
1/4 cup of raisins

-Combine the rice, water, 1 cup of milk, cloves, cinnamon and 1/2 cup of the condensed milk in a large heavy bottomed saucepan over medium heat, stir to combine.
-Bring the mixture to a boil stirring constantly.
-Reduce the heat to low and simmer stirring every 3 minutes or so. The milk will start to thicken.
 -Add the evaporated milk,sweet cream, the rest of the condensed milk and 1 cup of milk. Let the mixture simmer and keep stirring until the rice is tender and a little mushy.
-Add the other cup of milk and the raisins.Continue cooking over medium heat until the mixture comes to a boil.
-At this point the rice will be very tender and the milk will be very thick and soupy, which is perfect.
-Remove the saucepan from the heat and let it cool.
-Transfer pudding to a serving bowl and press plastic wrap over the surface to prevent a skin from forming, refrigerate until cold or eat warm.
Enjoy!!


International Delight's Pin to win Sweep
To enter, you must visit the International Delight Ice Cream Social Pin Board any time between July 15th and August 15th and use the #IScream4ID hashtag before pinning any image of your choice.

5 Grand Prize Winners could win $400 towards throwing the Ultimate Ice Cream Social !

Thumb_id-coldstone_600x817

Love ice cream + coffee? This summer, International Delight is bringing your favorite Cold Stone Creamery ice cream flavors to coffee and they're celebrating by giving away five $400 grand prizes to throw this summer’s ultimate Ice Cream Social!  To enter, visit the ID + Ice Cream Pinterest board and pin your favorite image using the #IScream4ID hashtag. Good luck!

This is a sponsored conversation written by me on behalf of International Delight. The opinions and text are all mine.

This is a sponsored conversation written by me on behalf of International Delight. The opinions and text are all mine.

Wednesday, February 27, 2013

Red Velvet Cake with Mascarpone Cream Cheese Frosting for The Cake Slice Bakers

Well, I am back from a week of blog resting. Not really because I wanted, but because we all were hit with the flu at home. Of course, the virus started at the office where I work, and as much I stayed away from the person that brought such a joyful vitus the next day I started to feel awful.
Long story short, after a trip to the doctor, a few days off and antibiotics I have been feeling better. Now, as you can imagine the baby has the flu.

Any way, I am more than behind with my month's post for my baking group The Cake Slice Bakers. This month's cake was an amazing and scrumptious Red Velvet Cake, which I actually baked and ate last month. I have always been a fan of red velvet cake as long as is made with really good quality ingredients and the best cocoa. I have been using a recipe from a famous baker for a long time and I have never been disappointed by it. I was eager to try this new one from the book Vintage Cakes, the frosting in this recipe uses mascarpone cheese, which I have had in my to do list forever. I have to say, recipe is incredible!
You should totally give it a try.

Red Velvet Cake with Mascarpone Cream Cheese Frosting
From the book Vintage Cakes by Julie Richardson


Ingredients for the cake:

2 1/2 cups cake flour, sifted
1/2 cup unsweetened cocoa powder
2 tsp. baking powder
1 tsp. sea salt
3/4 cup canola oil
2 tsp. pure vanilla extract
1 tsp. red food coloring
3/4 room temperature unsalted butter,
1 ¾ cup of sugar
4 eggs and 2 egg yolks room temperature
1 cup buttermilk


Ingredients for the Frosting

4 oz. cream cheese , room temperature
4 oz. mascarpone cheese, cold
1/2 cup heavy whipping cream, cold
1/3 cup of sugar
1 tbsp. pure vanilla extract


-Preheat the oven to 350 F.Prepare the round baking pans with parchment paper and a light dust of flour for the sides.
-In a bowl, sift together the flour, cocoa powder, baking powder, and salt.
-In the bowl of an electric mixer,cream butter and sugar on medium speed until fluffy.
-With the mixer on low speed, drizzle in the oil into the batter.
- Add the vanilla and food coloring and mix until completely combined. Slowly turn the mixer back up to medium-high and beat until fluffy again. Scrape down the sides of the bowl.
-Add the eggs and egg yolk one at a time,scraping down the sides of the bowl after each egg addition
-With the mixer in low speed, gradually add the flour mixture in three parts, alternating with the buttermilk, starting and ending with the flour .
Scrape down the sides of the bowl after each addition.
Do not to over-mix the batter.
-Divide the batter into the prepare pans and  bake for about 28-30 minutes or until a toothpick comes out clean
-Cool the cake in the pan for 30 minutes before removing onto a cooling rack.


For the Frosting:

Using a standard mixer with the paddle attachment,beat the cream cheese until uniform in texture.
Add the mascarpone cheese, heavy cream, and sugar.
Beat on low speed until combined, scraping the sides of the bowl ensuring all ingredients are incorporated.
Turn the speed up to high and beat until the frosting looks creamy and thick, lower the mixer speed and add the vanilla and mix until just blended.

This frosting keeps in the refrigerator for up to 5 days.

Assemble cake and enjoy!!


Monday, June 11, 2012


Happy Monday!
This is a very excited week for us at home, my little Camilla is graduating from Pre K on Friday and I am as happy as if she were graduating from college. Time goes by so fast, I still can't believe the fact that she will be in Kindergarden next September.
As you can imagine, mama is getting ready for graduation day, lots of cookie and cake for the party at school.

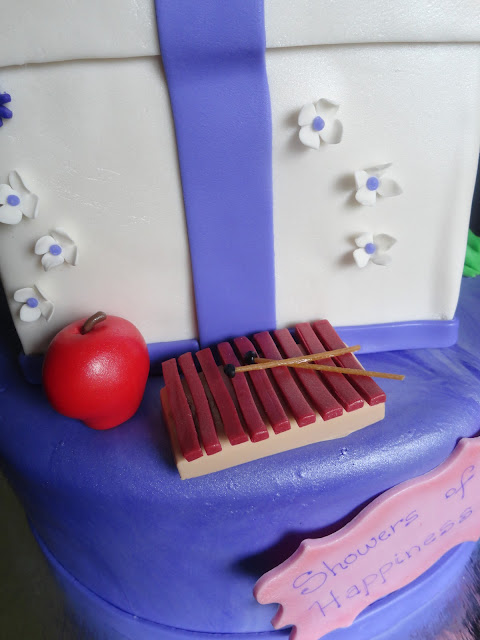
In the mean time, today I am showing you a fun cake a made for a Bridal Shower. The bride to be is a teacher, she loves frogs, dogs,umbrellas,shoes, bags, flowers and plays the marimba. The colors of the wedding are going to be different shades of purple, so when her mom placed the order she wanted all those details incorporated in the cake.

The frog was pretty easy to make, all in gumpaste with a dust of pearl dust.

I love how the little dog turned out. (tutorial coming up soon).

I used cookie cutters for the bag and shoe.


Handmade apple and marimba,

I used gumpaste for the bow, which I made and let it dried for a few days.


Any fun plans for this week?

Wednesday, June 6, 2012

Mini Salted Caramel Apple Pies


Last week I shared these yummy Mini Apple pies with my blog friend Natalie from Growing Up a NJ Wife and Mom Blog.
When she invited me over to guest post I wasn't sure what to bring, and instead of making life complicated with fondant figures and difficult cakes, I decided to bring her something mini and yummy .

These mini Salted Caramel Apple pies are super easy to make.


Mini Salted Caramel Apple Pies
You will need:

  • Pie Crust
  • Flour
  • Egg whites
  • Pastry brush
  • Round cookie cutters
  • Lattice cutter dough ( optional, you always can cut the dough with a knife)
  • Caramel Apples (I used the recipe from Butter Yum Blog, Patricia is such a great cook. Find the recipe here)
  • Small cupcake pan
  • Brown sugar
  • Caramel Sauce (I got Fleur de Sel from Trader's Joe)
Instructions:

-Preheat the oven to 350.
-Turn the pie crust onto a lightly floured surface and using the bigger round cookie cutter cut the small pie disks.
-Spray the mini cupcake pan with non stick cooking spray and place the disks inside.
-Brush some egg white inside the disks and bake until the egg white has lost its glossy sheen. Around 15 minutes

-While the mini disks are baking, take the other pie crust and run the lattice cutter over it.
-Use the small round cookie cutter and cut the pie's disk.
-When the mini pies are done, get them out of the oven and fill them with the caramel apple and  top them off with the smaller pie disk

-Brush some egg whites on them and sprinkle a little bit of dark brown sugar on top of each mini pie.
-Put them back in the oven for 20 minutes or until you start to see the brown color around the edges and top of the mini pies.


-As soon as you pull them back from the oven, drizzle them with the caramel sauce

Now enjoy!
Your welcome!


Wednesday, May 23, 2012

Fresh Beat Band Cake

Another Fresh Beat band cake full of color and details.
This is the same design as this cake that I made before.
The only difference is that this time I am pretty proud of the guitar,it may not look like a real one but I was able to stand it up, I guess I let her dry a little longer than the other one I made.


How is your week so far? mine has been full of Pedyalite for the girls, if you know what I mean.

Monday, May 14, 2012

Small Elmo Cake


 This Elmo cake was made for a little girl turning 2 years old a few weeks ago. The first Elmo cake I have ever made was for my little Camilla, I like colorful cakes and Sesame Street primary colors are so cheerfull and appropriate for little ones.

I made the Elmo topper with rice crispy treats and then I piped the fur with red royal icing, the eyes, nose and mouth were made with fondant.

Last year I was at Michael's and I noticed a Cri Cut cartridge of Sesame Street on sale for $10.Knowing how expensive Cri Cut cartridges are I hurried and grabbed it. The cartridge was for the regular Cri Cut machine, not the one for cakes, I figure I was going to give it a try.
Well, I never got around it until I was asked to make the Sesame Street sign, oh boy I have to say that those $10 were worth every single penny.

I run a little test and not only I was able to make the street sign but also I can make all the other Sesame Street characters. I guess I don't have to tell you how excited I am. 


Now, not so cake related but I figure I will show you how I deliver my cakes
I buy the boxes at Walmart, prices start at $0.99. I know you can also buy them in bulk at Uline, they will be even cheaper, the problem is that I do not have space at my house or rental kitchen to keep them there.  Buying them a few at the time is my only option.

a.I start cutting the sides of the box with an exacto knife
b.I line the bottom of the box with a piece of  silicone shelf ribbed liner, they come in pre-measured rolls, you can get them really cheap at the Dollar Store. I have also found them really cheap at Walmart.
The sticky pliability of the silicone and the cake weight keeps the liner and your cake in place

c. I place the cake inside the box
d.I seal the sides and top of the box with tape.
and your cake is ready to go.

How do you transport your cakes?


If you want to see more Elmo cakes, click here, here ,here

Monday, September 26, 2011

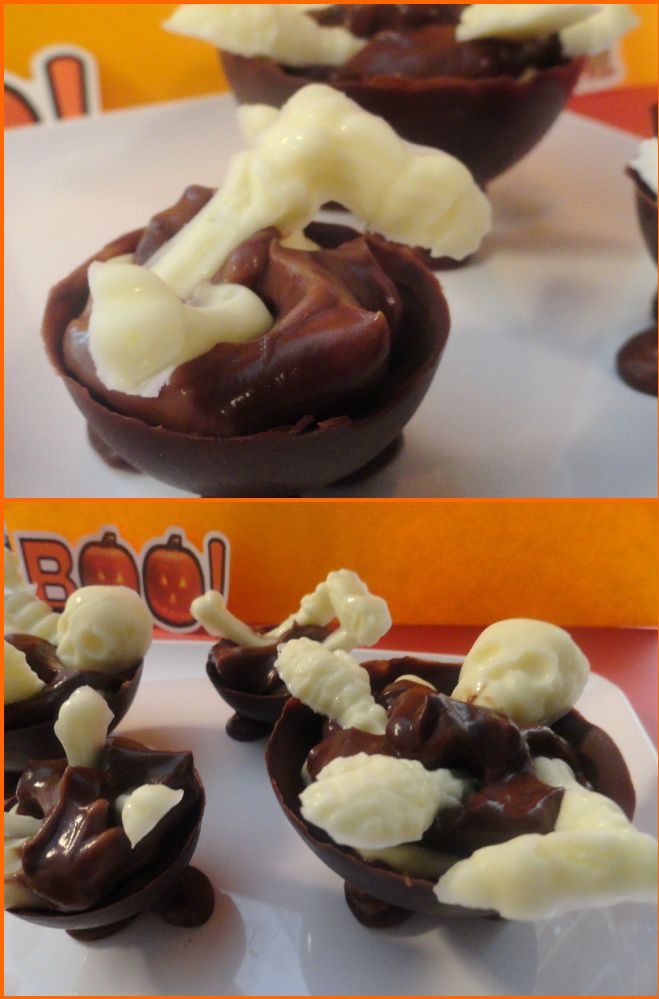
Chocolate and Vanilla Pudding Bowls with Skeleton Bones

Happy Monday!!
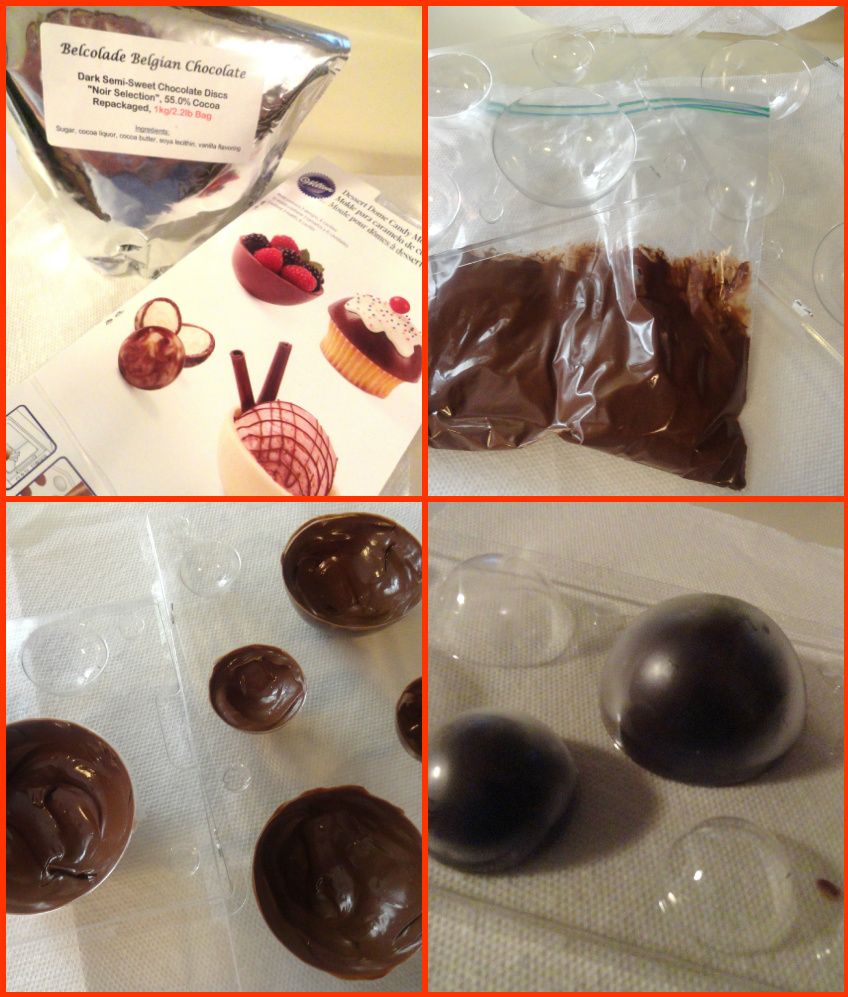
I am jumping in the Halloween wagon like everyone else and I made this chocolate and vanilla pudding bowls with skeleton bones. I did them a little bit in the fancy side because I used white chocolate and a really good quality Belgian chocolate, but you can use candy melts if you want.

For the Skeleton Bones you will need:

-White chocolate
-Skeleton candy mold ( you can get it at any Michael's store)


.Place white chocolate in a disposable decorating bag and melt in microware on 20 seconds intervals until the chocolate is melted.
.Fill the mold and put it  in the refrigerator until the chocolate has set, about 10 minutes.
.Unmold chocolate bones and set aside.
Photobucket


For the chocolate bowls you will need:

-Candy bowl molds
-Dark Chocolate ( I used a really good Belgian Chocolate)


.Place dark chocolate in a disposable bag and melt in microware on 20 seconds intervals until the chocolate is melted.

.Fill the molds lightly tapping it several times on a counter to eliminate air bubbles in the chocolate.

.Put the mold in the refrigerator until the chocolate has set, about 15 minutes.
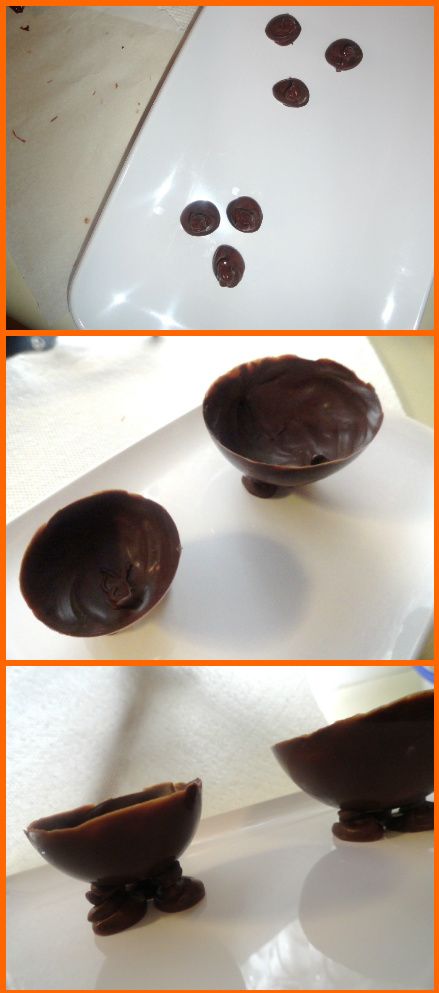
.To unmold , turn over the mold about an inch above a flat surface covered with parchment paper and gently tap the mold.


Photobucket

I made a few dots of chocolate and I sat the bowls on them.

Photobucket

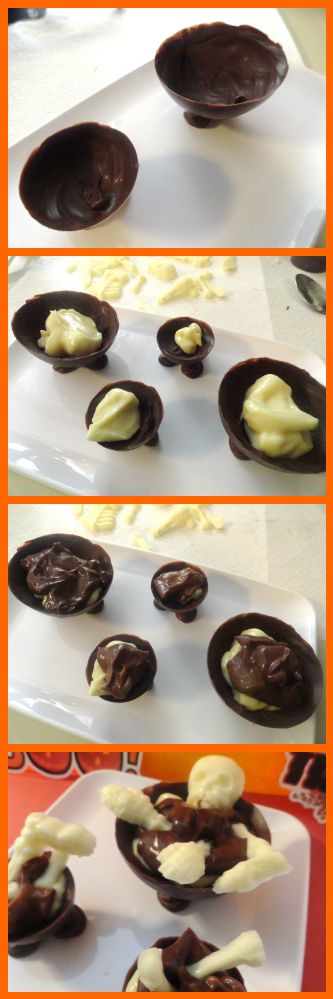
I guess I tried to mimic a cauldron's witch .I added a layer of vanilla pudding, another layer of chocolate pudding and I placed the Skeleton bones on top.
Done!
Photobucket


Photobucket
Have a great week and thank you for stopping by.

Tuesday, June 28, 2011

Phyllo Cups with Cinnamon and Condensed Milk Cream

I am a huge lover of condensed milk, I like it with bread, saltine crackers and also with fresh strawberries.Yes, I have weird eating habits!
Condensed milk is one of the reasons I love this little dessert so much, besides, is really easy to make and the ingredients are pretty much always in my house.The filling can be made in advance and refrigerate until is ready to serve,it is so creamy and refreshing, perfect for these summer days! .


Phyllo Cups with Cinnamon and Condensed Milk Cream
Adapted from Everyday Food Magazine

INGREDIENTS:

3 sheets frozen phyllo dough, thawed
2 tablespoons unsalted butter, melted
3 tablespoons sugar
1 cup cold heavy cream
6 tablespoons sweetened condensed milk
1/4 teaspoon cinnamon
Pinch of salt
1/2 teaspoon unsweetened cocoa powder


-Preheat oven to 325 degrees.
- Lay 1 sheet phyllo on a work surface (always cover remaining sheets with a lightly damp towel).
- Brush phyllo with a little bit of butter and sprinkle with some sugar. Keep layering twice more with remaining phyllo, butter, and sugar.
-Cut stacked phyllo into 6 equal pieces and gently press each square into a cup of a standard muffin pan, make sure phyllo sits flat in bottom of cup.


-Bake until phyllo is golden brown, about 20 minutes, rotating pan halfway through.
-Take out of the oven and  let cool completely in pan on a wire rack.


TO MAKE THE FILLING:

-In a bowl, combine cocoa powder with a small amount cream and stir until powder dissolves.
-Stir in the remaining cream, condensed milk, cinnamon and pinch of salt.
-Whisk until firm but not dry peaks form and refrigerate until ready to serve.


Fill phyllo cups with the filling cream and sprinkle with a little more cocoa powder.

According to the recipe and if you are looking into something more adventurous...
you can add a tablespoon of Kahlua, Baileys or Espresso powder .