Monday, June 25, 2012

Homemade Marshmallow Lollipops


Last week I made homemade marshmallows for the first time, it was easy and delicious.
Now I am officially obsess with them and I couldn't wait to make marshmallow lollipops.
Piece of cake!
Aren't they yummy and good looking?


 To make marshmallow lollipops I used the same vanilla recipe as last time and I added 3 drops of sky blue gel coloring. I can't wait to make new flavors and use different colors.
Can you imagine pink with bubble gum flavor, green with pistachio flavor,lavender, oh the possibilities are endless.

Instruction to make the marshmallow lollipops:

1-Line a baking sheet with parchment paper and coat it with with cooking spray. I used canola because that's what I had at home.


2- Make the marshmallow batter and fill a large pastry bag fitted with a medium round tip.
3-Pipe long lines in parallel rows across the baking sheet. Do not dust with marshmallow coating. Let the marshmallow "lines"set for 1 hour.


4-After an hour, you will see that the marshmallow can be gently lifted without breaking.

5- Line another baking sheet with parchment paper and dust it with marshmallow coating.

6-Roll the lines of marshmallow into coins and lay them flat on the baking sheet.
7-When you have rolled them all, dust them with marshmallow coating and let them cure for 3 hours in a cool place.
8-After curing the marshmallows for 3 hours, insert the lollipops sticks pushing them almost all the way through the top.

Use a pastry brush to brush off any excess of coating.

Enjoy!


They were good and I can't wait to make more!

Friday, June 22, 2012

Vanilla Homemade Marshmallows


Believe it or not, I have never made homemade marshmallows, that's until last week. As I was browsing my inbox I stumble upon Bakerella's post about making homemade marshmallows.
I realize that I have been having Shauna Sever's book, Marshmallow Madness for quite some time and I always keep postponing my marshmallow making.


Well, not for too long! I grabbed the ingredients, calibrated my candy thermometer like she recommends in her book and so I went and I made marshmallows.

The only problem I encountered in my marshmallow making experience,was promising Camilla marshmallows for dinner if she was a good sister and helped me playing with the baby while I was waiting for the sugar to get to the proper temperature.
Some how Cami thought, that having marshmallows for dinner, was in fact, that, ONLY marshmallows and not real food.-well marshmallows are really food, aren't they?

Classic Vanilla Marshmallows
Recipe by Shauna Sever


Classic Coating for  marshmallow:

combine 1 1/2 cup of confectioners’ sugar and 1 cup cornstarch.

The Bloom:

4 1/2 teaspoons unflavored powdered gelatin
1/2 cup cold water

The Syrup:

3/4 cup granulated sugar
1/2 cup light corn syrup, divided
1/4 cup water
1/8 teaspoon salt

Making the marshmallows;

2 teaspoons pure vanilla extract and 1/2 cup Classic Coating

-Coat an 8-by-8-inch baking pan with cooking spray.
-Whisk together the gelatin and cold water in a small bowl and let soften for 5 minutes.
-Stir together the sugar, 1/4 cup of the corn syrup, water, and salt in a medium saucepan over high heat.
-Boil, stirring occasionally, until the temperature reaches 240°F.
Meanwhile, pour remaining 1/4 cup corn syrup into the bowl of an electric mixer fitted with the whisk attachment.
-Microwave gelatin on high until completely melted, about 30 seconds. Pour it into the mixer bowl. Set the mixer speed to low and keep it running.
When the syrup reaches 240°F, slowly pour it into the mixer bowl.
-Increase the speed to medium and beat for 5 minutes. Increase to medium-high and beat for 5 more minutes.
-Beat on the highest setting for 1 to 2 minutes more and beat in the vanilla; the finished marshmallow will be opaque white, fluffy and tripled in volume.

 Pour it into the prepared pan, using an offset spatula to smooth it into the corners. Sift coating evenly and generously over top. Let set for at least 6 hours in a cool, dry place. ( this is one of the difficult parts, waiting)


-Use a knife to loosen the marshmallow from the edges of the pan. Invert the pan onto a coating-dusted work surface and dust it with more coating. I used a pizza cutter to cut the squares. I then dip each square in more coating patting off the excess.


I stored my marshmallows in a big glass container.


So, not that bad for a first time.
 I can't wait to try more flavors, my next one will be cookies and cream.

Monday, June 18, 2012

Graduation cake-We did it!!


We did it!
and no, it wasn't us graduating from Pre K, it was our little Camilla.
Last Friday  was her graduation and we were beyond excited, I was nervous making sure she knew all her lines for the songs and poems of the ceremony.
At the end, we had such a good time and everything went really well.
I made a little cake for her classroom snack time, my first time making the "ruffle cake".
 Not that bad but I definitely need more practice.

Proud mama!

If you don't mind me sharing, here are some pic of the day.


Have a wonderful week everyone.

Monday, June 11, 2012


Happy Monday!
This is a very excited week for us at home, my little Camilla is graduating from Pre K on Friday and I am as happy as if she were graduating from college. Time goes by so fast, I still can't believe the fact that she will be in Kindergarden next September.
As you can imagine, mama is getting ready for graduation day, lots of cookie and cake for the party at school.

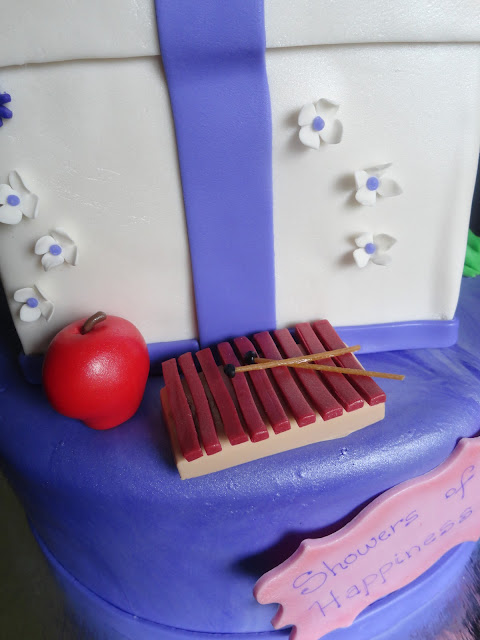
In the mean time, today I am showing you a fun cake a made for a Bridal Shower. The bride to be is a teacher, she loves frogs, dogs,umbrellas,shoes, bags, flowers and plays the marimba. The colors of the wedding are going to be different shades of purple, so when her mom placed the order she wanted all those details incorporated in the cake.

The frog was pretty easy to make, all in gumpaste with a dust of pearl dust.

I love how the little dog turned out. (tutorial coming up soon).

I used cookie cutters for the bag and shoe.


Handmade apple and marimba,

I used gumpaste for the bow, which I made and let it dried for a few days.


Any fun plans for this week?

Wednesday, June 6, 2012

Mini Salted Caramel Apple Pies


Last week I shared these yummy Mini Apple pies with my blog friend Natalie from Growing Up a NJ Wife and Mom Blog.
When she invited me over to guest post I wasn't sure what to bring, and instead of making life complicated with fondant figures and difficult cakes, I decided to bring her something mini and yummy .

These mini Salted Caramel Apple pies are super easy to make.


Mini Salted Caramel Apple Pies
You will need:

  • Pie Crust
  • Flour
  • Egg whites
  • Pastry brush
  • Round cookie cutters
  • Lattice cutter dough ( optional, you always can cut the dough with a knife)
  • Caramel Apples (I used the recipe from Butter Yum Blog, Patricia is such a great cook. Find the recipe here)
  • Small cupcake pan
  • Brown sugar
  • Caramel Sauce (I got Fleur de Sel from Trader's Joe)
Instructions:

-Preheat the oven to 350.
-Turn the pie crust onto a lightly floured surface and using the bigger round cookie cutter cut the small pie disks.
-Spray the mini cupcake pan with non stick cooking spray and place the disks inside.
-Brush some egg white inside the disks and bake until the egg white has lost its glossy sheen. Around 15 minutes

-While the mini disks are baking, take the other pie crust and run the lattice cutter over it.
-Use the small round cookie cutter and cut the pie's disk.
-When the mini pies are done, get them out of the oven and fill them with the caramel apple and  top them off with the smaller pie disk

-Brush some egg whites on them and sprinkle a little bit of dark brown sugar on top of each mini pie.
-Put them back in the oven for 20 minutes or until you start to see the brown color around the edges and top of the mini pies.


-As soon as you pull them back from the oven, drizzle them with the caramel sauce

Now enjoy!
Your welcome!


Monday, June 4, 2012

JUNE-Cake Artist of the Month-CAKE HERO


June Cake Artist of the month is here and today I will introduce you to the talented Melissa from Cake Hero.
As you can see in her cake's pictures,Melissa has an eye for design unique cakes, she lives in New York, which is the perfect place for her to find inspiration for all her sweet creations.
Stop by her page and feast your eyes with her lovely cakes.

On Melissa's words....

I'm self taught...about six years ago I started making Wilton cake pan cakes for fun (at that point I hadn't even baked a box cake!) and somehow it just grew and grew. There are a lot of things I love about making cakes, but there are two things I always come back to. The first is how much I love being a part of milestones in people's lives. Graduations, weddings, birthdays...no one is ever Unhappy about receiving a cake! People order these cakes with excitement and the expectation that it will make their special day just that much more special, and I feel so honored to be included in those moments. My second favorite part of making cake is how ephemeral it is...people take their pictures, pose with the cake, and then voila! It is cut up and eaten, just a lovely sweet memory.


http://www.cakehero.com/
http://facebook.com/cakeheronyc
https://twitter.com/#!/CakeHeroNYC
email: melissa@cakehero.com