Showing posts with label Halloween Ideas. Show all posts

Thursday, October 23, 2014

Silly Ghost, Black cat and Coffin -Halloween Cookies

 
For this month’s cookie tutorial for The Cookie Cutter Company Cami and I we decided to make some fun and silly Halloween cookies. Halloween is one of my favorite day to have fun, be silly and celebrate and now that my oldest girl is in to helping mommy with everything I drag her along to decorate these cookies.
 
I love detail oriented cookies, but  don’t we also love the simple cookies?  the ones that don’t require too many colors and steps!  Black and white icing, Halloween sugar pearls and a little black sugar is all you need to decorate these cookies.


Supplies you will need
 
Icing bags
Black sanding sugar
Unused tooth brush
Tweezers


Silly speckled ghost cookie

 
Outline and flood  your cookies with white royal icing. Let the cookie set for a few minutes and then outline and flood the black boots.
Let the cookies dry overnight.
Using an UNUSED tooth brush, dip the bristles in flooding consistency black icing and then run your fingers through the bristles to create a light speckling of black color.
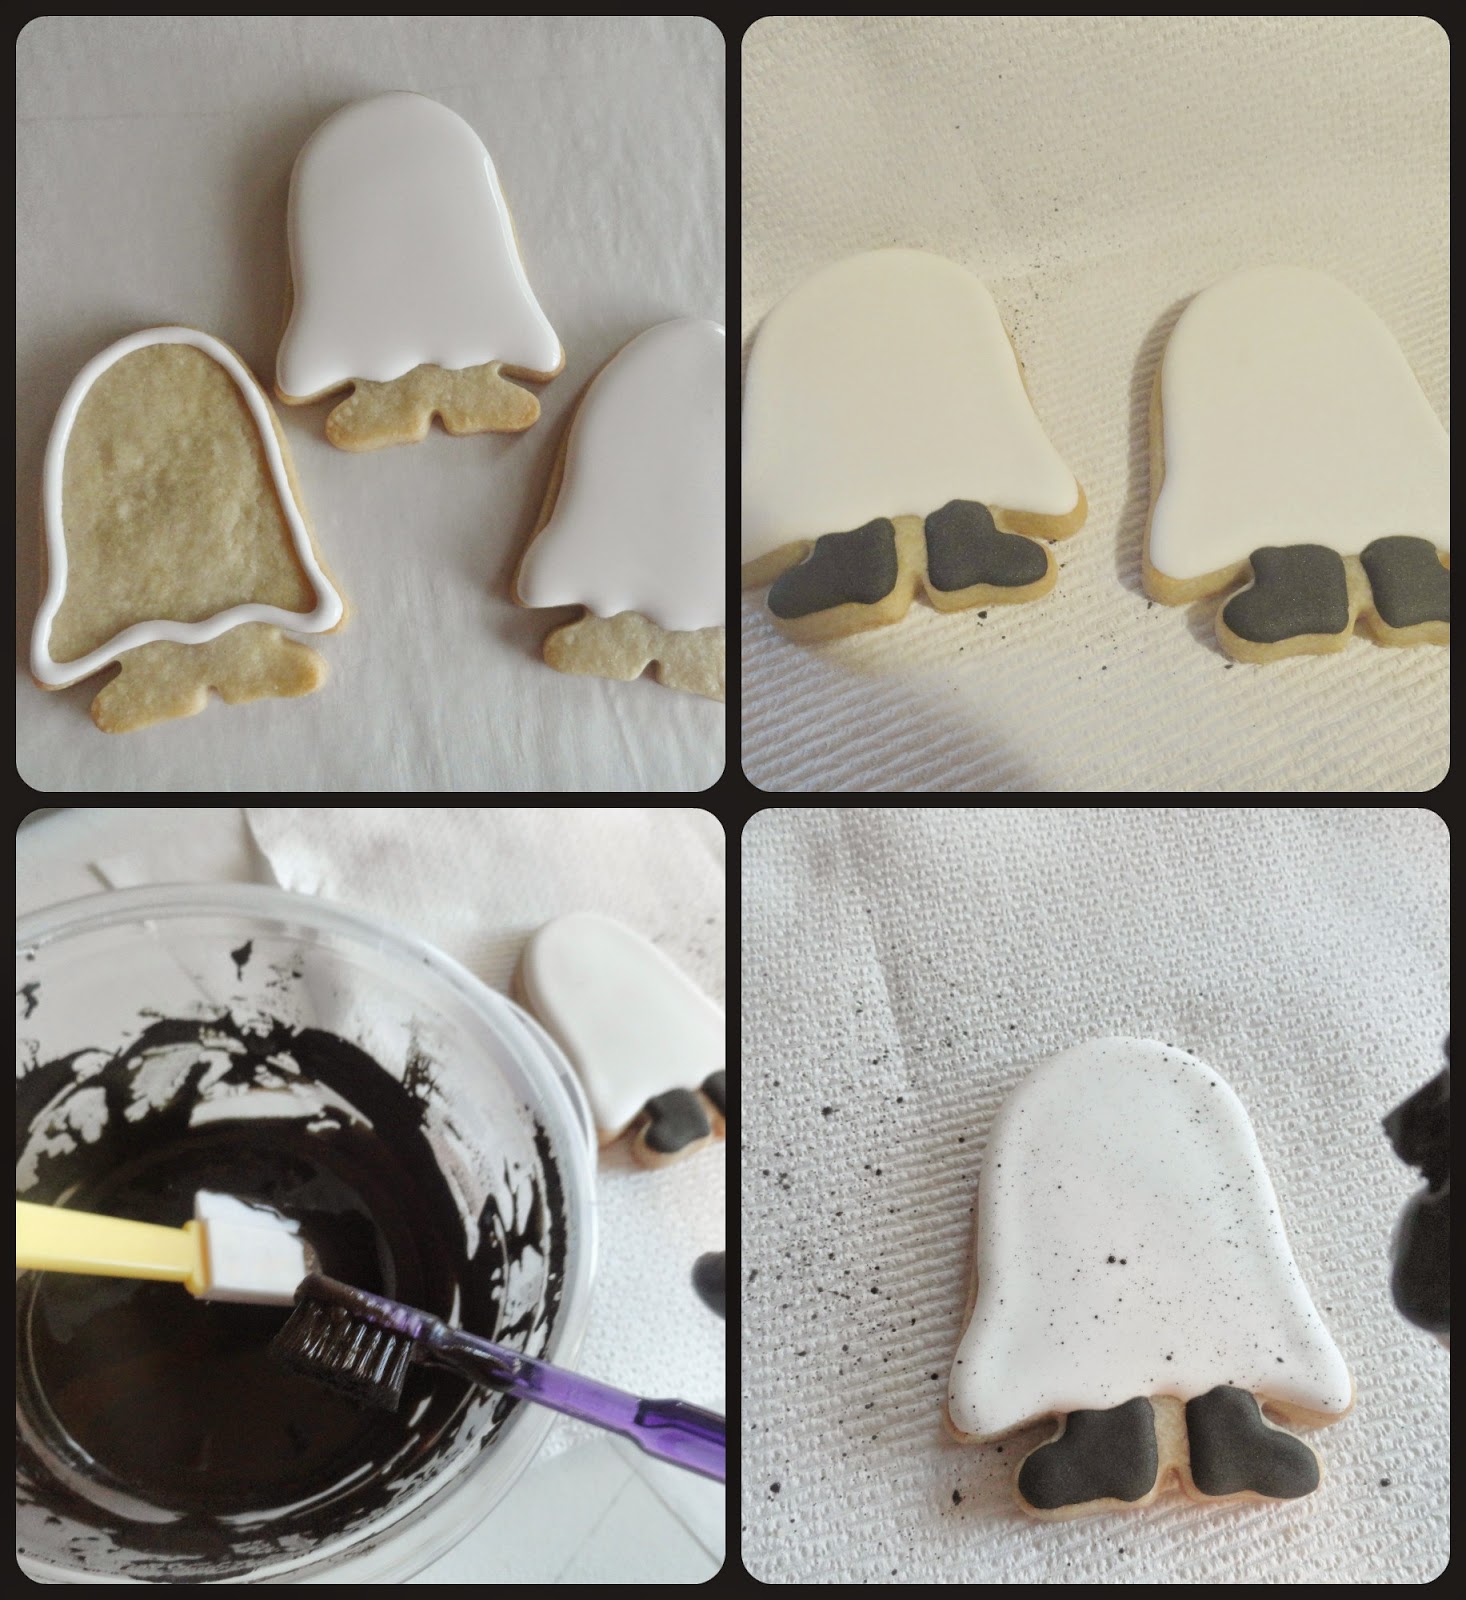
 
Add eyes, mouth, red tongue or any other detail you might want.


Halloween Cat Cookie


Outline and flood the cat cookie with black icing.

Let the cookies dry overnight.
Outline the cookies again and sprinkle them with black sanding sugar. Can you tell that sprinkling sanding sugar could be one of my daughter’s favorite decorating techniques.


Black coffin cookie

 
Outline and flood the cookies with black royal icing, let the cookies set overnight.

Using tip #1,   sketch the basic structure of the skeleton using a picture of the human skeleton as reference, there are plenty of templates onlione.  If you want to get more detail oriented, a kopykake will be the best option, I was looking for the easiest way, you know sometimes I am lazy like that.

I started drawing the ribs section and from there I moved to the limbs and head.


Once the skeleton has been drawn, outline the coffin with black icing. Attach the Halloween sugar pearls in your desire pattern.
Thank you for stopping by!


Wednesday, November 6, 2013

18th Birthday-Black and Orange Cake


I know, you are provably running for your sun glasses to keep looking at this cake picture, but in real life the orange wasn't that bright. Just a regular orange. My camera is playing tricks on my lately.

This was a fun cake to make, a little time consuming,but at the end I had a very happy client. I even got a tip $$, bonus right?

I made the cake for an 18th birthday party, it was right after Halloween and that's why they wanted a black and orange colors for the cake. The design and colors were based on the party invitation which included the bows and the leaf pattern.

I used a mold to make the leaves, I got it at Michael's and is a Wilton brand, I have had it for a long time and I even thought about giving it away. I am glad I didn't it.


When I finished this cake a was in full joy mode.

 I have one more Baby Shower cake to make in December and I am having a cake break for a while. I have been so busy, not having to much time for myself, plus the holidays are just around the corner and I want to spend as much time as possible with my little ones. 

Watching movies and drinking hot chocolate in our PJs is in our future.


Thank you for stopping by.

Friday, October 26, 2012

Halloween Cake-Cute Witch Face Mini tutorial


Happy Friday!! The spirit of Halloween has finally arrived at my house. Well, it actually has been there for a while but time is always against me and just now I had the time to make a cute Halloween cake to share with you.
A simple cute face of a witch and small bat and ghost cookie cutters make this cake a cute little treat for any Halloween party.


This face took me pretty much no time to make, and was easy to make.Let me show you how...


You will need:

.Satin Ice orange fondant for the hair
.skin tone color fondant for the face and ears
.black Satin Ice fondant for the eyes
.purple or color of your choice for the hat
.witch hat cookie cutter, I got mine from Michael's
.oval cutter for the face, but you can always use a round cutter and work the face's shape with your fingers.
.small brush
.food marker
.pink pearl dust

Instructions:

1-Roll the fondant out and cut the face, pull the top of the face (forehead) a little, that's where you are going to be placing the hair.
2-Roll two little pieces of fondant between your fingers to make the ears, use a modeling tool to give them a little indentation in the middle.


3-Cut the witch hat and set aside
4-Make the hair, start adding little flat pieces of fondant around the face. Then roll small pieces of fondant between your fingers and place them around the face and on top of the flat hair. Attach the hair with a dab of water and don't pres them hard against the other pieces that you already have in place. You want to give the hair some movement.

5-Using your finger, roll small pieces of fondant and form the eyes and eyebrows.Attach them with a dab of water.
6-Make the nose, and buckle for the hat.
7-I used a food marker to draw the mouth and a small brush to apply pink pearl dust for the chicks.

And this is how the face will end up looking.
Have a great weekend and thank you again for stopping my blog.

Monday, October 10, 2011

Halloween Linzer Cookies


I found this Linzer cookie cutters at the store and I couldn't resist to get them. 
 I didn't make the traditional linzer cookie recipe because I just wanted to use Dulce de leche as a filling.


I used this recipe,  minus the olive oil because one of the reviews kind of scare me.
The cookies were very light and combined perfectly with the sweet the filling.


Spread a tablespoon of Dulce de leche on the bottoms of each cookie and sandwich together.


Thursday, October 6, 2011

Bat cupcake Toppers

Dress up your cupcakes with these easy fondant bat toppers that you can make with your kids.


Here is Cami working hard with fondant


 For the bat toppers you will need:

-Small rolling pin
-Black fondant,
-Small and big bat cookie cutters
-Black and red royal icing
-Small pieces of paper towel

Roll out the fondant and cut the bat shapes with the cookie cutters.


Put the bat's wings on top of the pieces of paper towel to give the wings some movement

Add details to the bats with the black icing, I just did whatever lines I felt like it. I also added some red icing by the "mouth"area to pretend it was blood. Let the bats dry for a few hours.


Get your cupcakes ready...


 Place the bats on top of  the cupcakes and your good to go!


Monday, October 3, 2011

Easy Lime Pie with Spiders

I cheated making this "pie" and I do not feel bad about it. I usually do not bake anything using any mixes or nothing prebaked, but the reality is that this week we are having a baby!

This past weekend was all about cleaning the house, getting ready for the baby to come home, me being away for 4 days and trying to have as much fun as possible with Cami.

oh, did I mention that my husband decided to get a 4 week old puppy also, yes, that will be for another post!

Cami and I played, made crafts and also we were able to make some sweets for the blog, which we happily ate over the weekend also.
I figure these are my last days eating what ever I want, so might as well enjoy them.

I was very "original" with the recipe, I took it straight from the can, but I do not regret it, it was good and I still have a few pieces left for today and tomorrow.
I figure something like this will be so easy to make on Halloween, specially if you have a newborn around and just came out of a C Section.


Lime Pie the easy way!

INGREDIENTS:

1 prepared 9 inch graham cracker crust
1 can condensed milk
1/2 cup of fresh lime juice
2 cups of whipped cream
Grated lime peel


Photobucket


Photobucket

TO MAKE THE SPIDERS:

You will need a small rolling pin, green sparkle gel and

Photobucket

Roll the fondant and cut the spiders with the cookie cutter

Lift the spiders with a spatula ( so they don't break)

Put the spiders on top of the paper towel and let them dry for a few hours

Make the spiders eyes using the green sparkle gel ( this is what I had on hand,
 you can use what ever color you have or royal icing)

Put the spiders on top of the pie and enjoy a slice.


Have a great weekend everyone, I will updated you with the baby as soon as I get home and feel better.

Monday, September 26, 2011

Chocolate and Vanilla Pudding Bowls with Skeleton Bones

Happy Monday!!
I am jumping in the Halloween wagon like everyone else and I made this chocolate and vanilla pudding bowls with skeleton bones. I did them a little bit in the fancy side because I used white chocolate and a really good quality Belgian chocolate, but you can use candy melts if you want.

For the Skeleton Bones you will need:

-White chocolate
-Skeleton candy mold ( you can get it at any Michael's store)


.Place white chocolate in a disposable decorating bag and melt in microware on 20 seconds intervals until the chocolate is melted.
.Fill the mold and put it  in the refrigerator until the chocolate has set, about 10 minutes.
.Unmold chocolate bones and set aside.
Photobucket


For the chocolate bowls you will need:

-Candy bowl molds
-Dark Chocolate ( I used a really good Belgian Chocolate)


.Place dark chocolate in a disposable bag and melt in microware on 20 seconds intervals until the chocolate is melted.

.Fill the molds lightly tapping it several times on a counter to eliminate air bubbles in the chocolate.

.Put the mold in the refrigerator until the chocolate has set, about 15 minutes.
.To unmold , turn over the mold about an inch above a flat surface covered with parchment paper and gently tap the mold.


Photobucket

I made a few dots of chocolate and I sat the bowls on them.

Photobucket

I guess I tried to mimic a cauldron's witch .I added a layer of vanilla pudding, another layer of chocolate pudding and I placed the Skeleton bones on top.
Done!
Photobucket


Photobucket
Have a great week and thank you for stopping by.