Showing posts with label CakeToppers. Show all posts

Friday, October 3, 2014

Carnival Theme Cake & GIVEAWAY- Cake Decorating Bakery Business Management Excel Software Spreadsheet


Today not only I have a cute cake to show you
but also a fabulous giveaway from ExpressExcel Shop on Etsy that I am sure you would love.


First let me show you this Carnival theme cake that I made to celebrate a little boy's birthday. 
 I loved how the bear sitting on the ball turned out and the pop corn on the bottom tier is actually real. I figure is was better to eat real pop corn than modeled fondant pop corn!


I used an online letter font template and my trusty kopykake to write the little boy's name on the plaque.


For cakes using bright and primary colors I always recommend buying the fondant already colored, is very time consuming color fondant and the colors do not turn out as good as they should be!


Now for the GIVEAWAY.... let me show you some screen shots of this
 
 
Whether you are a home based business, rent kitchen space or run your own bakery, this Management Excel Spreadsheet will come very handy to keep track of all your expenses. It will help you to stay organize and actually see your profit instead of guessing it.
 

The ExpressExcel shop on Etsy has generously giving me one
 Cake Decorating Bakery Business Management Excel Software Spreadsheet
 TO GIVEAWAY TO ONE OF MY READERS!!

This easy to use Microsoft Excel template makes it simple to manage your orders, cost out your recipes and figure out what to price your order at to get the profit you deserve!

- Track your Sales, Expenses, Profit, and Return on Investment (ROI%), monthly and yearly!
- Automatically calculates the cost of ingredients based on the measuring units needed for your recipes
- Keep track of your current inventory, orders, customers, ingredients, materials, and recipes!
- Track your orders by type (Anniversary, Birthday, Wedding, Baby Shower, Holiday, etc.)
- Automatically generated charts to view your performance!
- View Directions boxes or Scroll over cells to easily view instructions on what data should be entered


Enter to win a Cake Decorating Bakery Business Management Excel Software Spreadsheet
 by leaving a comment on my blog.
 
Giveaway is open on INSTAGRAM AND THIS BLOG ONLY.
 
Giveaway will remain open until Tuesday, October 7th at 12 noon CST.
 Winner will be chosen at random, announce in this post and will have 48 hours to respond.
 
 
And the Winner is :
 
methal alrawi said...
it will be really nice if i won it, it just gonna make my life easier! thanks for the giveaway..


Friday, August 15, 2014

Fiesta Theme Cake


 Well, Happy Friday!
It's been over a month since my last post. What a busy Summer I have had around here.

I haven't baked a lot this Summer, after a back injury and other issues I decided to take some time off and just focus my "baking" time in other things.
I have done so much with the kids and I am sad that in just a few more weeks we will be welcoming cooler temperatures.

Any way, even if I haven't baked a lot lately, I still have a lot to share from past projects so today I want to start by sharing this festive and colorful cake with you.


  I made this Fiesta Theme Cake for one of my client's husband.
 The cake was lemon with raspberry buttercream covered in chocolate fondant.
 Details included festive maracas, Mexican hats  and a guitar.

 
I used yellow fondant for the maraca's colors and I use a small brush to pain some Americolor orange and green color on them .
 The guitar was pretty easy to make using a guitar cookie cutter.


Thanks for stopping by!!

Tuesday, March 18, 2014

Simple Circus Theme Cake


Last weekend we celebrated the 3rd birthday of one of our friend's little girl. .
This year the theme was circus, so obviously a circus cake was in order to make. As much as I wanted to make a circus tent, which I think is a must in all circus cakes I really didn't have the time to go that way. I was making a very detail engagement cake that really took more time to make than I expected.

Any way, I decided to make a rustic buttercream cake with details of colorful sprinkles around it.


And as much as I am against performances of animals in a real life circus, what is a circus cake without some cute sugar animals??. 
 I have to say that this Seal Lion is one of my favorites.

This is a mix of lion and bear, I couldn't get either one :)


And this little hippo dancer turned out too cute!!!
Happy Tuesday!! 

Tuesday, January 28, 2014

Blush Pink Bird House Baptism Cake


I made this blush pink bird house cake for a 1st birthday and Baptism celebration a few weeks ago.
 The original design is by someone else, the mom sent me the picture of the cake and I was more than happy to make it as close looking as possible. 

I love how the little bird house turned out. I made it with rice krispy treats and gumpaste. 
For the birds, I ordered this Ateco Plain Coma cutter , it comes in different sizes and seems very useful for other cake design details. I made the tree template myself. 

I am not too fond of using fabric ribbon on cakes, but this was pretty simple and thin
 and it end up looking cute rather than bulky. 


Friday, November 8, 2013

Farm theme cake


Happy Friday!! I hope you all had a great week. 
My week has been fantastic, I have been able to catch some sleep, organize my baking supplies/tools and watching movies with the girls almost every night. Can't ask for a better way to spend my extra time.

For today's cake I have this adorable Farm theme cake I made for two little boys.They are twins and were turning one and their mom planned a big party.  I love making cakes for little boys, and I love even more when I have the freedom to do anything I want, I always do more than expected ,
 specially for my regular clients.


I used all the techniques I learned on my Crafty class-Animal cake toppers and I added a few more of my own.
For the grass I used green stiff royal icing with a Wilton grass tip.
To make the hay I used my clay gun.
 All the animals were made using Wilton fondant.
 These are the little smash cakes, love them!!
 Compare their size with a fork, so tiny!!

 Big hugs for the cake pops makers!!! I had to make a lot of cake pops and ohh boy!! that is a lot of work.
Have a great weekend!!

Wednesday, October 30, 2013

Super Horse to the Rescue!!-How to make a Horse cake topper using the techniques I learned from Craftsy!


HAPPY HALLOWEEN!!!  Today I have a little eye candy for you with the most adorable little cake topper.
Remember last week's post? I reviewed one of Craftsy's classes, Cake Toppers Techniques-Fondant Animals, so I decided to go ahead and practice what I learned from Craftsy making a cake topper.
Enter... Super Horse to the rescue!!


This tiny little horse turned out so cute , all dress up for Halloween and it was so easy to make.
Let me show you how...


Materials you will need:

-Black and brown edible writers ( you can use the brown to make some hair on the horse's head)
-Dark and light brown fondant
-Black fondant
-Small brush and water
-Modeling tool ( optional)
-Small pairing knife
-Shortening
-Small rolling pin and mat
-Wilton #12 round tip
-Small piece of paper towel or plastic wrap
-One piece of spaghetti pasta


Instructions:

-Start by knitting the fondant and making a log ( use shortening if the fondant starts to stick to your hands)
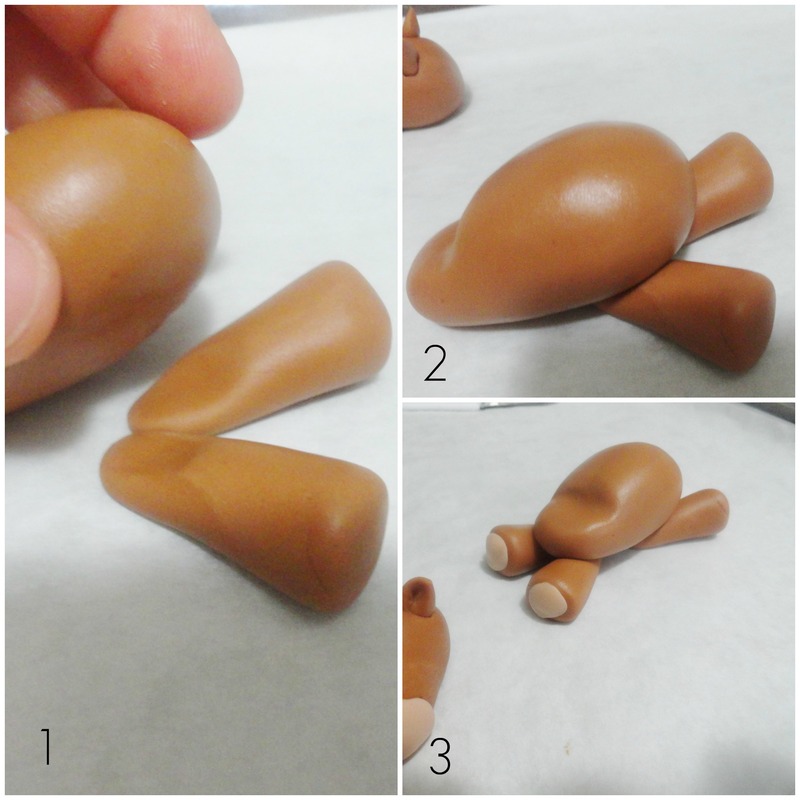
-Using the knife, mark and then cut the fondant in 4 pieces, 1 will be for the head and ears, 2 pieces will make the body and the last piece has to be cut in 4 little pieces to make the legs.
-Take the 2 pieces of fondant and knit them together, then, using the palm of your hands make an egg shape
-Mark the top of the egg shape using your fingers ( that's where the head will be) and set aside.

To make the head, knit and form the fondant into a ball, then into an egg shape.Use your fingers to go back and for to mark the nose area. Use your modeling tool or a tooth pick to mark an indentation for the ears.

To mark the nose, just make an egg shape using light brown fondant and flatten it out, use a dab of water and attach to the horse face.


The ears are just tiny little pieces of fondant rolled into a tear drop, mark the center of each ear using the back of the brush. Attach the ears to the head with a dab of water. Use your black edible marker to make the eyes and nostrils.

The legs are made rolling the fondant between the palms of your hands into a cone shape.

Now that you have all the body parts made, begin assembling the horse.
Position the back legs close together, rub a dab of water on them and place the body on top. Do the same for the front legs.Notice I did mark the legs with a piece of light brown fondant that I just roll into a ball and then flatten it out and attach it with a dab of water.
Set the body aside to dry a little


To make the cape, I just rolled a small amount of black fondant and hand cut the shape of the cape. I inserted the spaghetti pasta into the top part of the body ( this is going to hold and support the head) and attach the cape to the neck area with a dab of water.
I wanted some movement for the cape, so I placed a small piece of paper towel underneath and let it dry.


Make the mask using your fingers and a big round tip to remove the fondant from the eye area.

To complete the horse assembly,attach the mask to the head with a little water and then insert the head into the pasta stick.
Set the horse aside and let it dry.


I didn't add a tail to my horse, ups!!


Place your cake topper on a cake and you are done!
a fun and easy little horse cake topper that can be use on a Farm or Western theme cake.


Don't forget that Craftsy can turn your cake ideas in reality, right in your own home, learning at your own pace and schedule.From fondant to isomalt and modeling chocolate, Craftsy Cake Decorating courses are taught by the best instructors from around the world.
Click here to receive 25% off your first Cake Decorating course with Craftsy!
This is a sponsored conversation written by me on behalf of Craftsy. The opinions and text are all mine.

Monday, August 5, 2013

Rustic Ombre Baby Shower Cake


 Ombre cakes are one of the biggest trends these days, I absolutely love the fading colors.

Two weeks ago I had the pleasure to gift this cake for a Baby Shower. The mom to be belongs to my church and she wanted to celebrate the special occasion big, with lots of friends and family.


I opted for this rustic ombre cake in a blue color palette, simple, but I really like how it turned out. The cake topper matched the invitation for the shower, I made it with fondant.
I had rock candy left form a previews project and I added it to the bottom tier just to add a touch of light yellow and green colors.

Cake was a success and there were no leftovers at all!

Tuesday, July 30, 2013

Dump Truck Cake


Dump Truck Cake for a little boy's 1st Birthday party.
I love how this cake turned out. The truck is made with rice crispy treats covered in fondant. I made the signs with gumpaste and a tutorial is coming up soon so anyone cake make the dump trunk.
 The sand is actually crush graham crackers.