


Maria of The Cakerator
Happy Sunday or Monday, depends when are you reading this post. I am so happy for my guest blogger today that I couldn't wait to post this adorable Trick or Treat Tote Bag Cake.The Cakerator Blog is one of my favorites cake blogs. Maria's post are always full of really good information regarding everything cake. Maria is a Cake Designer and Wilton Method teacher. She is in the process of getting her own cake business started.She told me that 5 years ago she got tired of the boring local bakeries and decided to learn cake decorating on her own,she jumped straight into fondant and advance decorating before she learned how to pipe or do anything else. That's my kind of girl! Maria also has an art major in school and uses her background to express her artistic side with all her cakes.
I invite you to visit her blog, you will find not only great cakes but also very useful tutorials.
Maria, this cake is beyond adorable, thank you so much!

Hey cake folks, glad to be invited to the party and get to add to this beautiful collection of confections. Thanks for having me Kathia! My name is Maria Campos AKA The Cakerator, I came up with the alias while I was thinking about how Arnold Schwarzenegger's nick name went from the Terminator to the Governator and thought, why not.
I'm self-taught, and been decorating cakes for about 5 years, today I am a Wilton Method Instructor, and cake artist. When Kathia asked me to be a guest blogger I went straight to my thinking place (my computer desk) to pull some ideas from google, and my first thoughts was, what is the very thing kids look forward to doing on Halloween, trick or treating of course! So why not make a trick or treat tote bag! I'm going to attempted to show you how to do this without taking up too much real-estate on Kathia's blog. So lets begin...

Everyone has one of these pans in there cupboard, you know you do! It's the 9" x 13" pan, you want to bake a dense cake in here, like a pound cake, or a doctored cake mix recipe in the form of a pound cake, your choice of flavor of course.

Cut a cake board to 6 1/2" x 3" in size, use that cake board you just cut as your guide when cutting out 4 pieces of cake the size of the cake board.
Once that is done place the cake on your prepared cake drum. Then level, fill, and stack.
Once that is done place the cake on your prepared cake drum. Then level, fill, and stack.

Next, crumb coat your cake

With a sharpened dowel, dowel your cake to the board, make sure the dowel is a bit shorter than your cake, and also that the dowel goes straight through the cake drum, this will anchor your cake to the cake drum, I use a hammer for this. Place the cake in the fridge to chill.

I found this picture on the web and thought it was super cut and decided to use this as my design for my tote bag, so I cut it out and used it as my template.
Edible images can be used and Halloween cookie cutters are also a fast and easier way to decorate your bag, you know you got a gazillon of them in your drawers!

Roll out the fondant, and cut out design with your cookie cutter, or use your templates and exacto knife to cut your designs.


Here is the almost finished sugar replica from the original design.

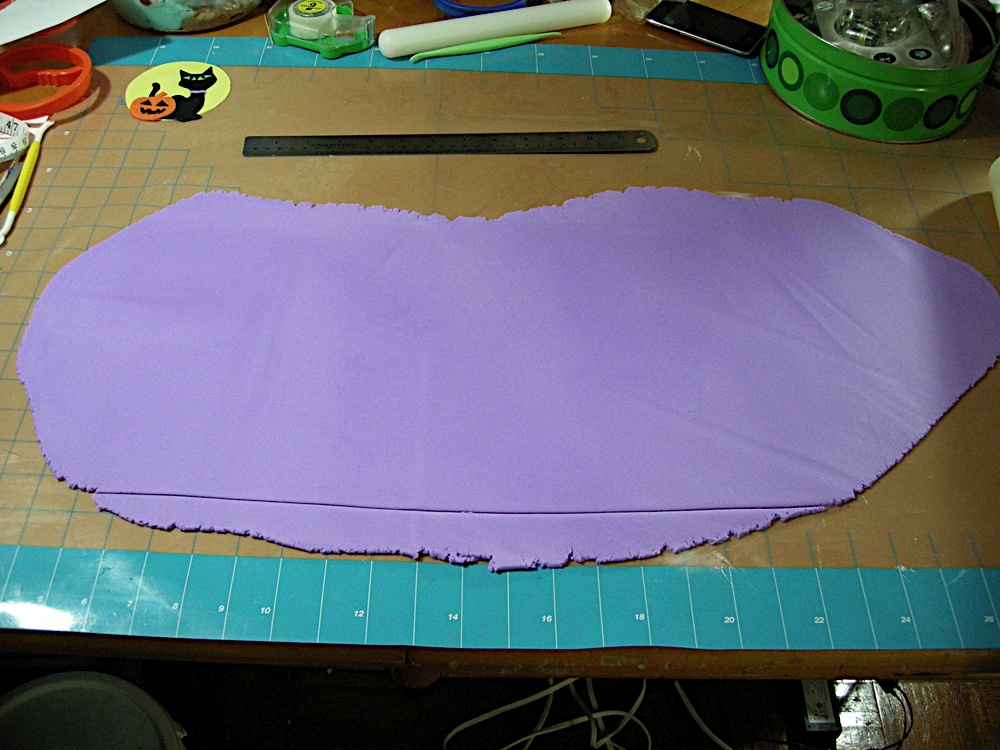
Now back to the cake, I rolled out some fondant between 1/8" to a 1/4" thick and measure it to wrap around the cake, making the width of it just about 3/4" to an 1" taller than the cake. Use a tape measure to help with this.

A note here, I added about 2 teaspoons of tylose to about 2 lbs of fondant to help it firm up to keep it's shape, and not flop over when wrapping my cake, you will see what I mean in a sec.

Dust your fondant with a little corn starch and roll it up, now go get that cake out of the fridge.

Now, unravel the fondant around your cake, and note how the fondant is staying straight up over the cake, that's the tylose working here, I did not add too much to make it break your tooth hard, so you will still be able to cut into this cake.

Continue to wrap it around your cake, and doing this on a turntable is highly recommended, join the fondant at one of the corners to end with a seam.

Trim the edges to make sure it is even and level all around

Still trimming here

Sharpen your corners... yes I know I need to trim the other side, it's bothering me too.

Once your cake is nice and covered and trimmed evenly on top, start to smooth it with a cake smoother... my cake is looking a little ashy here, ashy cakes me no likey!

Trim the excess fondant off the bottom edge

Get your design ready to attach to your cake.

And look! Can you see it coming all together now! Yah noticed it's shiny uh, no I did not pull a Cake Boss and steamed it, I just rubbed this sucker down with some shortening to get out the cornstarch because my cake was looking ashy, the shortening will absorbed into the cake and disappear, it's a trick I learned from Sharon Zambito of SugarEd Productions.

Now for the straps, get some polifill and parchment paper.

roll the polifill up in the parchment paper and tape it into a sausage like shape.

Place it on top of your cake, this will hold up your straps in place to dry.

roll and cut out a strip of fondant, use the same fondant you just used to cover your cake, only add more of the tylose powder, and enough of it to turn it into gumpaste.

Add some stitching to the stripes, every little detail counts.

Glue the straps with some gum glue and let it dry over night.

I thought buttons would add that extra something, so I used some tips to cut circles from fondant just the right size for buttons.

I indented the circle in the middle with my balling tool.

And used tip 1 to make the holes.

Glue those buttons onto the end of the straps, and how cute!!!!
Almost done now, don't forget to decorate both sides!
To finish it, I by piped some stitches with black royal icing, and piped the words with green royal icing, I also took my airbrush to my moon and pumpkin to add some shadowing, but it does not show up to well in the picture.
Not too hard right!?!
OK here are some things you can do to take this cake to the next level, take some candy corns and fill up the top with them, or use any assortment of candy, don't forget to scatter some on the board, make some cake pops with the scraps in the shape of candies, or why not get your candy molds and candy melts and make some lollypops and other halloween theme candies... AAWWW come on, you know you have some candy molds tucked away in your cake supplies!
Well that's it for now, come visit me at http://www.thecakerator.com/ for more tutorials and cake ideas. I hope you enjoyed this tutorial.
And thanks again Kathia for inviting me to your caketacular blog, KEEP CAKING!!!


16 comments:
What an amazing cake, such a different idea I love it. Thank you for the tips and tutorial.
Qué chula la tarta! me encanta! y un tutorial estupendo!
Muchas gracias a Maria por compartirlo.
Besitos,
What a GREAT cake! I love the details, especially the buttons! Fantastic tutorial!
I love a good tutorial. This is an awesome cake. Off to check her blog out :)
I knew Maria would do a great job! Such a cute cake!!
Gracias! Estoy feliz que te guste Karma!
Thanks everyone! I hope you all have great success making your little tote bags!
This is so unbelievably cute! So much talent - she makes it look so easy.
Oh my gosh this cake is amazing! Great job and thanks for sharing with us!!!
Muy interesante el tutorial¡¡¡
Muy original la tarta¡¡
Besos
Hi Maria!
Great tutorial! Thanks for sharing your tips..This cake is so original and cute. I'm an instant fan of yours!
The cutest cake ever!! Thanks for the great tutorial. I'm another instant fan!
Thank you so much... this is such a neat idea!
Absolutely adorable!!!
Awesome! What a great idea for a halloween cake!
LOVE IT!!! Thanks for sharing the tutorial! :o)
www.thebakingsheet.blogspot.com
awesome tutorial! :D
Post a Comment
Thank you for taking the time and leaving a comment.I really appreciate it.